Setup: Single node
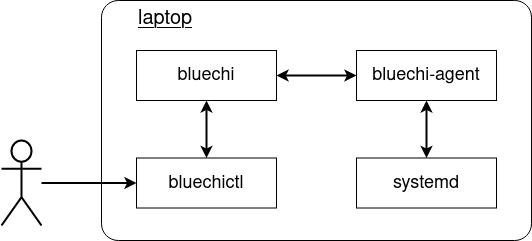
BlueChi’s two core components - the controller and the agent - can run alongside each other on the same machine. A single node setup like this is one of the quickest way to get started. This section describes how to achieve that. The diagram below depicts the desired state of the system:
Installation and configuration
First of all, lets install the controller and the agent as well as the CLI tool and the SELinux policy:
dnf install bluechi bluechi-agent bluechi-ctl bluechi-selinux
Once the installation succeeded, bluechi-controller and bluechi-agent need to be configured. Both components use default settings so that a single node setup requires minimal configuration effort.
For the bluechi-controller configuration, the AllowedNodeNames need to be adjusted in order to allow the bluechi-agent to register with its node name. By default, the agent will use the hostname it is running on.
BlueChi uses port 842 by default, which is considered a privileged port. To avoid any firewall issues for this demo, lets overwrite this setting and use the port 2020.
Lets create a new configuration for bluechi-controller in its conf.d directory:
echo -e "[bluechi-controller]\nManagerPort=2020\nAllowedNodeNames=$(hostname)\n" > /etc/bluechi/controller.conf.d/1.conf
Since the default port has been changed, this setting has to be adjusted for the bluechi-agent as well:
echo -e "[bluechi-agent]\nManagerPort=2020\n" > /etc/bluechi/agent.conf.d/1.conf
After running both commands, the following files should have been created:
$ cat /etc/bluechi/controller.conf.d/1.conf

[bluechi-controller]
ManagerPort=2020
AllowedNodeNames=<hostname>

$ cat /etc/bluechi/agent.conf.d/1.conf

[bluechi-controller]
ManagerPort=2020
Note
For a full list of available configuration options, please refer to bluechi(5) and bluechi-agent(5).
Running BlueChi
After installation and configuration has been completed, both applications can be started as systemd services:
systemctl start bluechi-controller bluechi-agent
Once the services are up and running, the journald logs should show that the agent successfully connected to the controller:
$ journalctl -u bluechi

Sep 14 14:51:58 laptop systemd[1]: Started BlueChi systemd service controller manager daemon.
Sep 01 14:51:58 laptop bluechi[3750775]: 2023-09-14 14:51:58,685+0200 INFO        ../src/manager/manager.c:924 manager_start        msg="Starting bluechi 0.5.0"
Sep 01 14:51:58 laptop bluechi[3750775]: 2023-09-14 14:51:58,928+0200 INFO        ../src/manager/node.c:870 node_method_register    msg="Registered managed node from fd 8 as 'laptop'"
...
Lets use bluechictl to list all units on the machine:
$ bluechictl list-units

NODE                |ID                                                         |   ACTIVE|     SUB
====================================================================================================
laptop              |time-sync.target                                           | inactive|     dead
laptop              |nfs-idmapd.service                                         | inactive|     dead
laptop              |sys-devices-platform-serial8250-tty-ttyS5.device           |   active|  plugged
laptop              |dev-disk-by\x2did-wwn\x2d0x5001b448b9db9490\x2dpart3.device|   active|  plugged
laptop              |podman.socket                                              |   active|listening
....
The setup works!
For more examples on how to use BlueChi, please see refer to the examples section.
Note
For a full list of available commands of bluechictl, please refer to bluechictl(1).