Setup: Multi node
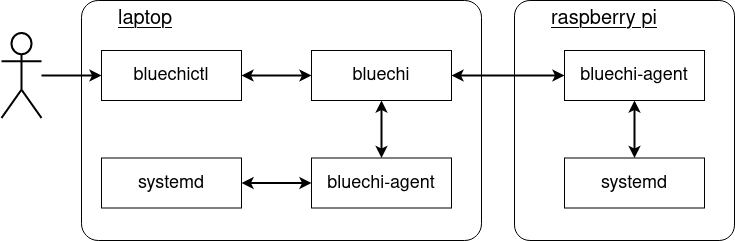
BlueChi is intended for multi-node environments with a predefined number of nodes. This section describes how to set it up based on an example with two machines - a laptop and a raspberry pi. The diagram below depicts the desired state of the system:
Installation and configuration
The main node will be the laptop. So first of all, lets install the controller, the agent and the CLI tool as well as the SELinux policy on it:
dnf install bluechi bluechi-agent bluechi-ctl bluechi-selinux
The raspberry pi will be (one of) the managed node in this example. Therefore, only install the agent and the SELinux policy on it:
dnf install bluechi-agent bluechi-selinux
Once the installations succeeded, BlueChi needs to be configured on both machines.
Configuring the main node
Lets start with the main node (the laptop in this case). The configuration of the controller running on the laptop is similar to the single node setup with the exception of adding pi as another node to it:
echo -e "[bluechi-controller]\nManagerPort=2020\nAllowedNodeNames=$(hostname),pi\n" > /etc/bluechi/controller.conf.d/1.conf
Lets also create the configuration for the agent on the laptop changing the port:
echo -e "[bluechi-agent]\nManagerPort=2020\n" > /etc/bluechi/agent.conf.d/1.conf
Configuring the managed node
In the next step the managed node (the raspberry pi in this case) needs to be configured. The managed node needs to know where to connect to, so the settings for the ManagerHost as well as the ManagerPort have to be set to the IP and Port of the main node. In addition, the NodeName has to be set to pi (as set in the AllowedNodeNames in the previous section).
Assuming the main nodes IP within the network is 192.168.42.10, the configuration file for the agent on the raspberry pi can be created like this:
echo -e "[bluechi-agent]\nManagerHost=192.168.42.10\nManagerPort=2020\n" > /etc/bluechi/agent.conf.d/1.conf
The content of the new file should be:
$ cat /etc/bluechi/agent.conf.d/1.conf

[bluechi-controller]
ManagerHost=192.168.42.10
ManagerPort=2020
Running BlueChi
After installation and configuration has been completed, lets start the systemd services.
Starting the controller and agent on the main node (laptop):
systemctl start bluechi-controller bluechi-agent
Switching to the managed node (raspberry pi), start the agent:
systemctl start bluechi-agent
Once the services are up and running, the journald logs on the laptop should show that the both agents have successfully connected to the controller:
$ journalctl -u bluechi-controller

Sep 14 14:51:58 laptop systemd[1]: Started BlueChi systemd service controller manager daemon.
Sep 01 14:51:58 laptop bluechi[3750775]: 2023-09-14 14:51:58,685+0200 INFO        ../src/manager/manager.c:924 manager_start        msg="Starting bluechi 0.5.0"
Sep 01 14:51:58 laptop bluechi[3750775]: 2023-09-14 14:51:58,928+0200 INFO        ../src/manager/node.c:870 node_method_register    msg="Registered managed node from fd 8 as 'laptop'"
Sep 01 14:52:02 laptop bluechi[3750775]: 2023-09-14 14:52:02,534+0200 INFO        ../src/manager/node.c:870 node_method_register    msg="Registered managed node from fd 9 as 'pi'"
...
Lets use bluechictl on the main node to list all units:
# list all units on the laptop
$ bluechictl list-units laptop

NODE                |ID                                                         |   ACTIVE|     SUB
====================================================================================================
laptop              |time-sync.target                                           | inactive|     dead
laptop              |nfs-idmapd.service                                         | inactive|     dead
laptop              |sys-devices-platform-serial8250-tty-ttyS5.device           |   active|  plugged
laptop              |dev-disk-by\x2did-wwn\x2d0x5001b448b9db9490\x2dpart3.device|   active|  plugged
laptop              |podman.socket                                              |   active|listening
...

# list all units on the raspberry pi
$ bluechictl list-units pi

NODE                |ID                                                         |   ACTIVE|     SUB
====================================================================================================
pi                  |acpid.path                                                 |   active|  running
pi                  |system-systemd\x2dcryptsetup.slice                         |   active|   active
pi                  |nfs-kernel-server.service                                  | inactive|     dead
pi                  |dev-ttyS24.device                                          |   active|  plugged
pi                  |dbus.service                                               |   active|  running
...
The setup works!
For more examples on how to use BlueChi, please see refer to the examples section.
Note
For a full list of available commands of bluechictl, please refer to bluechictl(1).